| TigerJython4Kids | robotics |
| Deutsch English |
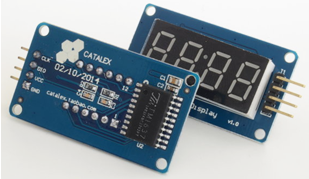
APPENDIX: 7-SEGMENT DIGITAL DISPLAY
![]()
SPECIFICATIONS AND CONNECTION TO THE MICRO:BIT |
|
EXAMPLES |
|
1. Count up from 0 to 9999 First, a display object is created with d = FourDigit(pin0, pin1) where the ports for CLK and DIO are specified. (If you omit the parameters, P0 is assumed for CLK and P1 for DIO.) The show(text) method can also display integers directly. |
|
Program: from mb7seg import FourDigit from microbit import * d = FourDigit(pin0, pin1) for n in range(10000): d.show(n) You'll realize that it takes about 30 ms to display a single number. With a format specification, you can write out the numbers right-aligned, use d.show ("%4d" % n). 2. Show the acceleration The digital display is often used to display values measured by a sensor, for example the x component of the acceleration. To do this, poll the sensor in an endless loop. sleep() is used to define the measurement period, but note this value is only approximate because other calls in the loop also require processor time. Program: from mb7seg import FourDigit from microbit import * d = FourDigit() while True: acc = accelerometer.get_x() d.show(acc) sleep(100) Here, the display object is created without parameter values, assuming that the terminals CLK and DIO are at P0 and P1. Program: from mb7seg import FourDigit from microbit import * d = FourDigit() d.setColon(True) while True: acc = accelerometer.get_x() / 100 v = "%05.2f" %acc v1 = v.replace(".", "") d.show(v1) sleep(100) 3. Show a prompt After the start, the prompt text is written out in scrolling text. Then the program loops until the button A is pressed. It would be inconvenient to use the blocking method scroll(), because the user would have to wait after pressing the button until the whole text is finished. Rather, it is preferable to scroll the text with toLeft(), so you can check the button every 300 ms.. To quit the repeating loops, use the keyword break. Program: from mb7seg import FourDigit from microbit import * d = FourDigit() d.show("Press A to start") while True: while d.toLeft() > 0 and not button_a.is_pressed(): sleep(300) if button_a.is_pressed(): break d.toStart() sleep(500) d.show("Go") You can not use button_a.was_pressed() instead of is_pressed() here because you call it twice. 4. Show the time With a cheap clock module (Real Time Clock, RTC), you can turn your micro:bit into a precisely running digital clock. The module uses the DS3231 chip. There are many sources of supply (Arduino/Raspberry Pi suppliers, Grove, eBay, the price varies between $1 and $10). The module uses that I2C protocol with 4 ports GND, VCC, SCL and SDA.
Program: from microbit import * s = 0 # Seconds m = 33 # Minutes h = 15 # Hours w = 2 # Day of week (Sunday = 1) dd = 3 # Day mm = 11 # Month yy = 2018 # Year def dec2bcd(dec): tens, units = divmod(dec, 10) return (tens << 4) + units addr = 0x68 t = bytes([s, m, h, w, dd, mm, yy - 2000]) for i in range(0,7): i2c.write(addr, bytes([i, dec2bcd(t[i])])) print("Datetime set to %d-%d-%d %d:%d:%d" %(dd, mm, yy, h, m, s)) Your program calls i2c.write(addr, 0) to send the command to the RTC module to return the current date-time. It then catches the reply with buf = i2c.read(). After the conversion to decimal format, hours and minutes are displayed on the seven-segment display. The colon flashes approximately every second. Program: from mb7seg import FourDigit from microbit import * def bcd2dec(bcd): return ((bcd & 0xf0) >> 4) * 10 + (bcd & 0x0f) d = FourDigit() showColon = False while True: addr = 0x68 i2c.write(addr, b'\x00') buf = i2c.read(addr, 7) mm = bcd2dec(buf[1]) hh = bcd2dec(buf[2]) d.show("%02d%02d" %(hh, mm)) # show leading zeros if showColon: d.setColon(False) showColon = False else: d.setColon(True) showColon = True sleep(1000)
Remark: The functions to handle the RTC are encapsulated in the Python module rtc that is downloaded as part of the micro:bit flashing procedure. (See TigerJython's micro:bit documentation). |
API DOCUMENTATION OF MODULE mb7seg |
| Module import: Class FourDigit
|
Professional advice:
From the three acceleration components you can calculate pitch and roll angles as shown below. Start the following program and tilt the board sideways or forwards and backwards. In the terminal window, the values of pitch and roll are written out in degrees.
from microbit import *
from math import *

def getPitch():
    a = accelerometer.get_values()
    pitch = atan2(a[1], -a[2])
    return int(degrees(pitch))

def getRoll():
    a = accelerometer.get_values()
    anorm = sqrt(a[0] * a[0] + a[1] * a[1] + a[2] * a[2])
    roll = asin(a[0] / anorm)
    return int(degrees(roll))

while True:
    pitch = getPitch()
    roll = getRoll()
    print("p: " + str(pitch))
    print("r: " + str(roll))
    print()
    sleep(100)


