TigerJython4Kids
 robotics
bewegen
Deutsch   English   

2. MOVE ROBOTS (MOTORS and LEDs)


YOU LEARN HERE...


the most important commands you can use to control your robot.


EXAMPLES

  Example 1: Driving and turning
The robot should first drive forwards, then turn left and then drive forwards again for a short distance.

The lines of your programme are executed in sequence. The command forward() sets the robot to the ‘forward’ state. delay(2000) gives the time in milliseconds until the microprocessor sends the next command left(). This sets the robot to the ‘turn left’ state. During the 550 milliseconds, the robot turns approx. 90° to the left. It then moves forwards again for 2000 milliseconds before it receives thel stop() command.


from mbrobot import *
#from mbrobot_plus import *

forward()
delay(2000)
left()
delay(550)
forward()
delay(2000)
stop()
► Copy to clipboard

We have refrained from displaying the import line for the Maqueen Plus V2 in all programme examples. If you are working with this model, the import line is

from mbrobot_plusV2 import *


Example 2: Doing more than one thing at the same time
Although the following programme consists of a sequence of instructions that are executed one after the other, the robot can do several things at the same time. The robot moves forwards for 4 seconds and then backwards for 4 seconds. While travelling backwards, it switches the LEDs on and off.

The motors and the LEDs are controlled by the microprocessor, whereby the microprocessor can also operate several actuators simultaneously. While the motors are in the backward state after receiving the backward() command,

setLED(1) switches the LEDs on and switches them off after 3000 ms with setLED(0). After a further 1000 ms, the motors receive the stop() command and the robot stops.  

from mbrobot import *
#from mbrobot_plus import *

forward()
delay(4000)
backward()
setLED(1)
delay(3000)
setLED(0)
delay(1000)
stop()
Copy to clipboard

With the Maqueen Plus, the LEDs can also light up in other colours (1:red, 2:green, 3:yellow, 4:blue, 5:pink, 6:cyan, 7:white)


Example 3: Move on an arc
The robot should first make a left arc for 5 s, then a right arc for 5 s and stop. Use the commands leftArc(r) or rightArc(r), where the radius r is in metres.

You can change the speed with setSpeed(speed).You can select values between 0 and 100 as speed. The default speed is 50.


from mbrobot import *
#from mbrobot_plus import *

setSpeed(40)
leftArc(0.2)
delay(5000)
rightArc(0.2)
delay(5000)
stop()
Copy to clipboard


REMEMBER...


The following commands are available for controlling the robot:

 forward()  drives forward
 backward()  drives backward
 left()  turns left
 right()  turnsright
 leftArc(r)  drives an a left arc with radius r
 rightArc(r)  drives an a right arc with radius r
 stop()  stops
 setSpeed(speed)  sets the speed (default 50)
 delay(ms)  stays in the same state for ms milliseconds
 setLED(1)  sets LEDs on (mbRobot_plus 1, 2, 3, 4, 5, 6, 7)
 setLED(0)  sets LEDs off
 setAlarm(1)  switches on a pip tone. The sound is played with a buzzer, which is also located on the robot board.
 setAlarm(0)  switches the pipton off

When programming robots, you have to think in terms of states. The forward() command sets the robot in a forward motion. While the motors are in this state, the microprocessor can issue commands to other actuators.

You can cancel a running programme at any time by setting the small switch on the back of the robot chassis to ‘OFF’.

You can also run all examples in simulation mode. To start a programme, click on the green run arrow instead of the robotics button. If you want to display the robot traces in the graphics window, insert the following line after the import line:
RobotContext.enableTrace(True)


TO SOLVE YOURSELF


1.
Create a course with some objects and write a programme so that the robot moves from the start to the finish.


2.
The robot should move in a left-hand arc until it has travelled a complete circle. It should then move in a right-hand arc for the same amount of time.  

3.

An alarm is switched on with setAlarm(1) (a pip tone). setAlarm(0) switches the alarm off. The robot should first move forwards for 5000 ms and then backwards for 5000 ms. It should switch on the alarm while travelling backwards.

The programme opposite switches the alarm on for 3000 ms.

 
from mbrobot import *
#from mbrobot_plusV2 import *

setAlarm(1)
delay(3000)
setAlarm(0)
Copy to clipboard


ADDITIVE: CONTROLLING MOTORS AND LEDs INDIVIDUALLY


The forward(), left() etc. commands control the entire running gear, which consists of two motors. However, you can also switch on the individual motors and control their speed. With motL.rotate(speed) , the left motor is set to forward motion and rotates at speed. For positive speed values the motor rotates forwards, for negative values it rotates backwards and for speed = 0 the motor stops. The motR.rotate(speed) command works in the same way for the right-hand motor.


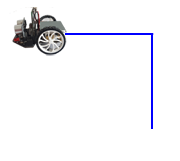
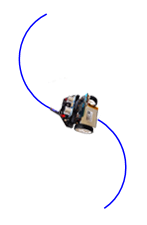
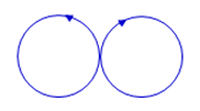
Example 4: The left motor first runs for 3 seconds at a speed of 50 forwards, then 2 seconds at a speed of 30 backwards. It then stops. First run the programme in simulation mode and observe the rotations in the graphics window.

from mbrobot import *
#from mbrobot_plusV2 import *

motL.rotate(50)
delay(3000)
motL.rotate(-30)
delay(2000)
motL.rotate(0)
Copy to clipboard


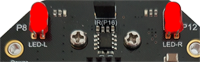
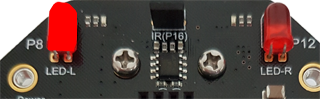
Example 5: Switch leds on and off individually
You can use the setLED(1) and setLED(0) commands to switch both LEDs on and off at the same time. You can also address the LEDs individually:

Your programme switches one LED on and the other off.


You use the following commands:

setLEDLeft(1) switches on the left LED
setLEDLeft(0) switches off the left LED
setLEDRight(1) switches on the right LED
setLEDRight(0) switches off the right LED

from mbrobot import *
from mbrobot_plusV2 import *

setLEDLeft(1)
setLEDRight(0)
delay(600)
setLEDLeft(0)
setLEDRight(1)
delay(600)
setLEDLeft(1)
setLEDRight(0)
delay(600)
setLEDLeft(0)
setLEDRight(1)
delay(600)
setLEDRight(0)
Copy to clipboard


Example 6: RGB LEDs (nur Maqueen Plus V2)

Maqueen Plus V2 has four RGB LEDs on the bottom of the robot. You can use the setRGB(id, r, g, b)command to make them light up in different colors, where id is the number of the LED, r is the red, g is the green and b is the blue color component. clearRGB() switches off all LEDs.

In your program, the first LED is switched on red, the second green, the third blue and the fourth violet in sequence. Then all 4 are switched off.

 
from mbrobot_plusV2 import *

repeat 3:
    setRGB(0, 255, 0, 0)
    delay(1000)
    setRGB(1, 0, 255, 0)
    delay(1000)
    setRGB(2, 0, 0, 255)
    delay(1000)
    setRGB(3, 255, 0, 255)
    delay(1000)
    clearRGB()
Copy to clipboard


TO SOLVE YOURSELF


4.
Let the two motors rotate forwards at the same speed for 4000 milliseconds.

5.
Run the left motor forwards and the right motor backwards for 4 seconds.

6.

How do you have to control the left and right motors so that the robot moves on a left-hand arc for 4 seconds?

7.

Add to example 3 so that when the robot travels on the left-hand arc, the left-hand LED lights up and when it travels on the right-hand arc, the right-hand LED lights up and the left-hand LED is switched off.